Start with a project-owned setup, then build your interface around it. Theme Manager can create a repository from the supplied WindowFramework defaults and connect its theme data, controller prefab, root UXML, and panel settings for you.
The workflow below uses that guided setup. You do not need to assemble the starter references one by one, copy Demo windows into your application, or edit the shipped default repository.
Before You Begin
- Use Unity 6.3 or later and review Asset Requirements before importing.
- Import WindowFramework into your project and let Unity finish importing and compiling the asset.
- In Edit > Project Settings > Player, ensure Active Input Handling allows the new Input System. Use Input System Package (New), or Both if your application also uses legacy input. Restart Unity if prompted.
- Decide where your project's UI assets should live. Repository creation needs a new destination under Assets, outside the installed WindowFramework folder and the source repository.
Addressables configuration is a separate, optional workflow, described later on this page. It is not enabled by creating a repository.
Setup at a Glance
The main setup ends with a configured window host in your scene. Your custom window content comes next, in Windows and Layout.
1. Open Theme Manager
From Unity's main menu, choose:
Tools > Garage-Ware Games > Window Framework > Theme Manager**
Click New Repository in the toolbar to open the guided setup form. You can also reach the workflow through Create Project Theme Repository in the repository browser.
For a first setup, keep the supplied asset defaults as the source. These are distinct from the repositories inside the Demo folder: the defaults provide the starter setup, while Demo repositories illustrate usage and appearance.
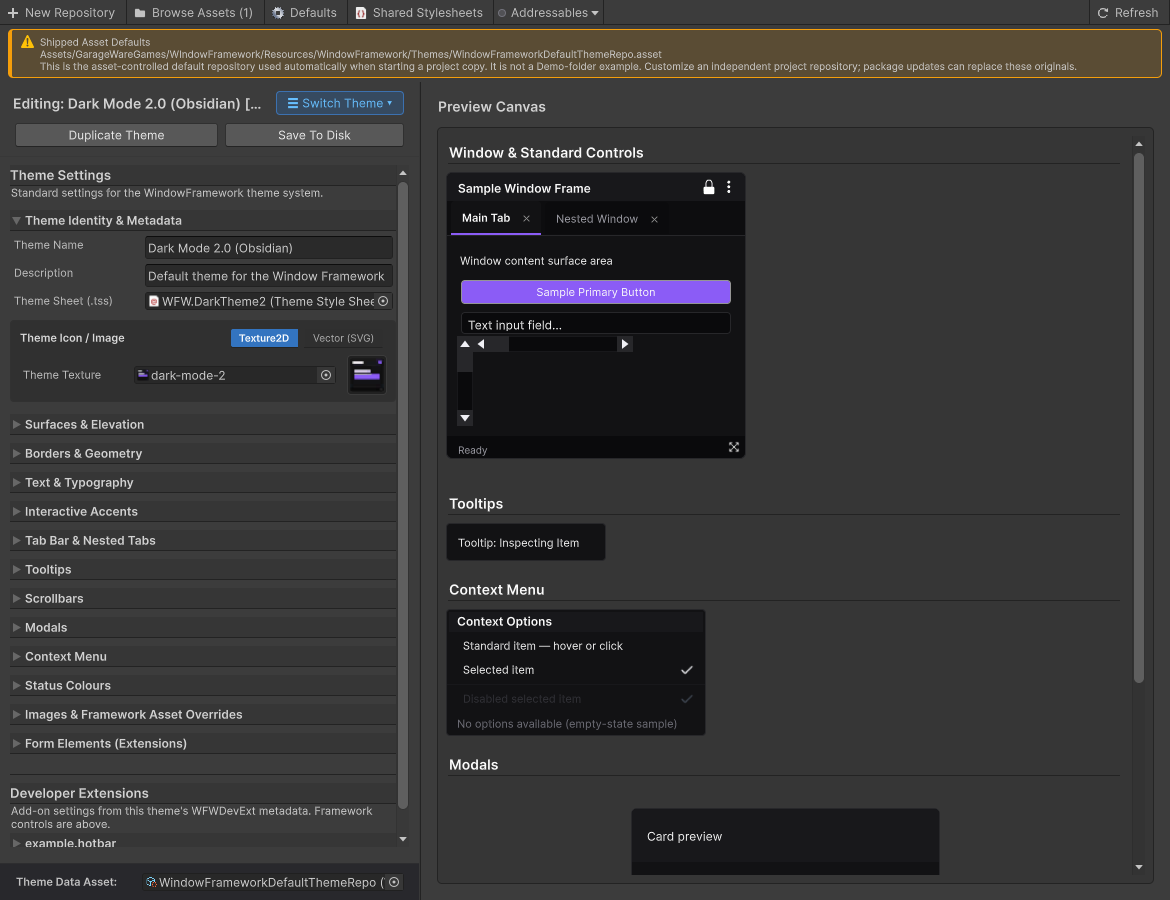
2. Configure Your Project Repository
Work through the setup form from top to bottom. The fields describe the repository you are about to create; browsing and checking the form do not create it.
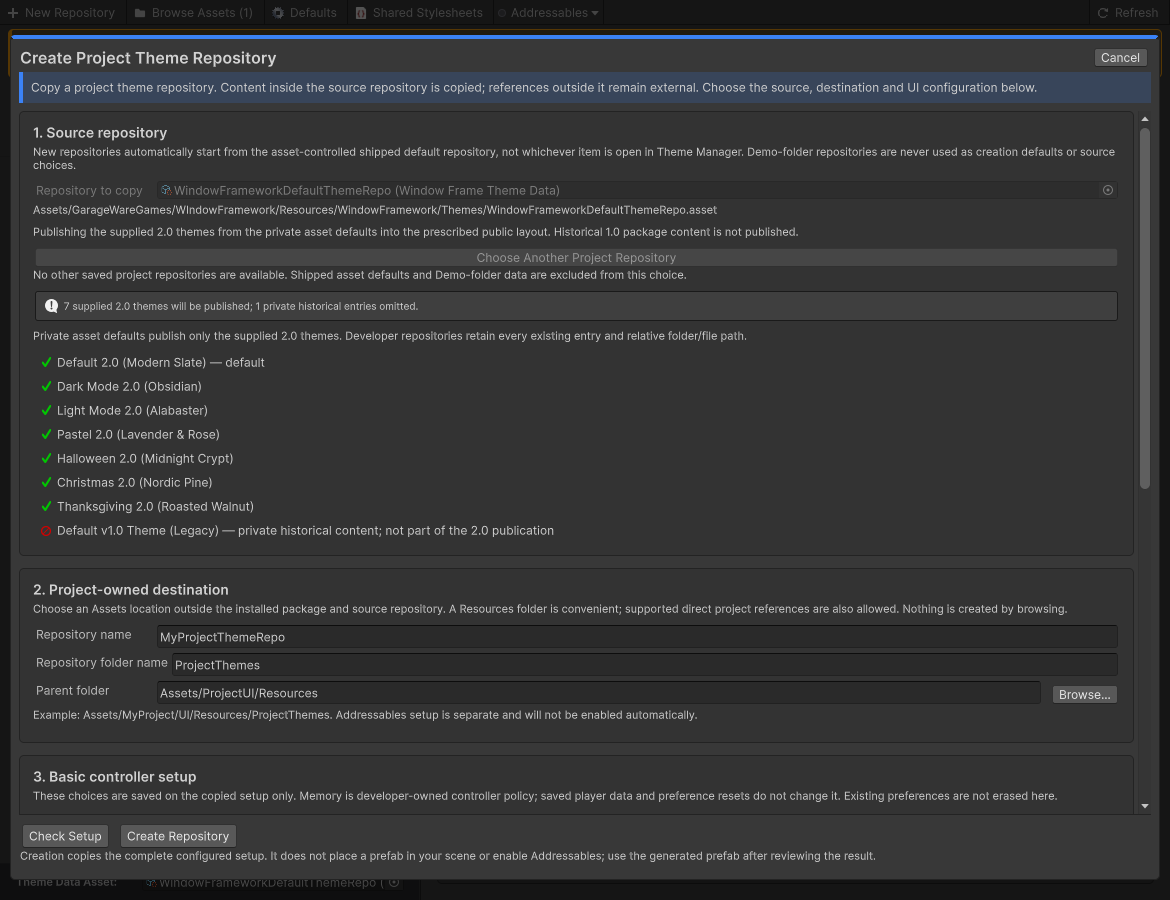
Repository Source
The form starts with the supplied WindowFramework defaults. This is the straightforward starting point for a new application.
Choose Another Project Repository** is for copying an eligible repository you already own. That copy preserves its existing layout and configuration rather than rebuilding it as a fresh default setup. Demo-folder repositories are not offered as copy sources.
Repository Name and Destination
The names serve different purposes:
- Repository name names the ThemeData asset and its display name in Theme Manager. Enter the name without the .asset extension.
- Repository folder name names the new folder that will contain the copied setup. Enter a folder name, not a full path.
- Parent folder is the location beneath Assets in which that new folder will be created.
For example, a parent of Assets/MyProject/UI/Resources and a repository folder name of ProjectThemes produce Assets/MyProject/UI/Resources/ProjectThemes.
A Resources location is suggested for convenience, but supported direct project references are also allowed. Choose a fresh destination: creation does not merge into or overwrite an existing repository folder.
Basic Controller Setup
For a setup created from the supplied defaults, review these controller choices:
- Remember window state determines whether the copied controller enables window memory. Individual windows also need to participate in memory and use suitable identifiers; see Windows and Layout.
- Debug telemetry enables the controller's diagnostic option. Use it when investigating framework behavior; it is not needed to create window content.
- Save-data filename names the runtime persistence file. It is separate from the repository asset name and folder name.
- Apply theme to chooses the styling scope: Window Frames Only, Parent Panel, or All Panels.
Use Window Frames Only when you want the theme to target framework windows rather than the surrounding interface. Parent Panel extends the scope to the controller's panel. All Panels reaches more broadly and can affect other UI through stylesheet precedence; choose it deliberately when integrating with an existing interface.
Memory enablement remains your controller policy. Player themes, saved preferences, and preference resets do not override it.
PanelSettings
You can request a new PanelSettings asset or select an existing project-owned panel.
Enable I have a PanelSettings asset only when you want to reuse one, then assign it in Existing project panel. The selected panel is shared intentionally: repository creation does not rewrite its stylesheet, scaling, or text settings.
Otherwise, the workflow creates a new PanelSettings asset beside the generated theme data. WindowFramework's theme composition is supplied through the controller; the setup does not add a WindowFramework stylesheet to the panel asset itself.
Review and Create
Click Check Setup to review the current source and inputs. Resolve any validation messages, then click Create Repository.
The form displays progress while it copies and reconnects the setup. Wait for the success message before using the result. If you cancel, the form asks for confirmation and removes operation-created output after the current Unity asset operation finishes.
On success, Theme Manager opens the new ThemeData and reports the generated asset locations.
3. Bring the Setup Into Your Scene
For the supplied-default workflow, the result includes:
- Your named ThemeData asset, with the copied theme collection and configured stylesheet references.
- RuntimeWindowFrameworkController.prefab, with a WindowFrameController and UIDocument.
- WindowFrameworkRuntimeRoot.uxml, a blank root for the runtime interface.
- PanelSettings.asset, unless you chose to share an existing project panel.
- The copied theme and runtime styling assets needed by that repository configuration.
References inside the copied source are reconnected to their copies. References to artwork or other assets outside that source boundary remain external references; creation does not silently replace every shared dependency.
Place the generated controller prefab from your project repository into the intended scene.** Do not use the shipped template as your application's repository setup, and do not add a second host if that scene already contains your intended controller. The controller is a singleton and persists across scene loads.
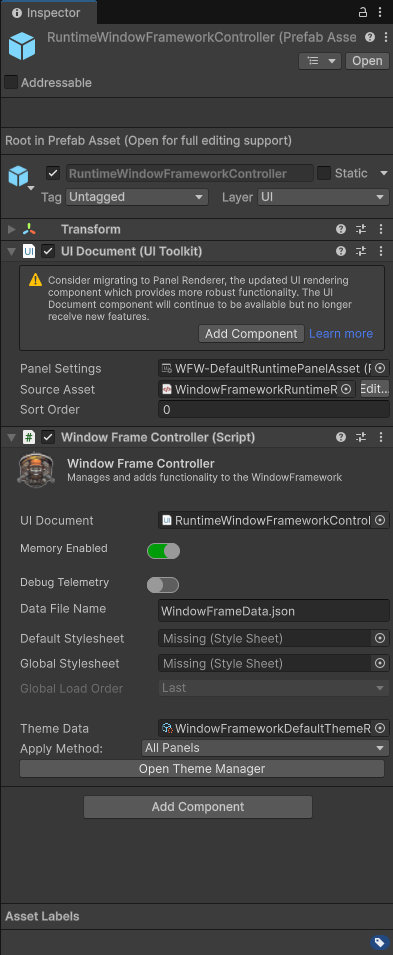
Inspect your generated instance and confirm:
- The UIDocument has its Panel Settings and Source Asset references assigned.
- The WindowFrameController points to that UIDocument and your generated Theme Data.
- The controller's memory choice, persistence filename, and theme application scope match your setup choices.
Save your scene after placing and configuring the instance.
Repository creation does not place an instance in the scene, add Demo windows or hotbar content, or create your application's custom controls. A blank root is expected at this stage; it is not a missing-window error.
4. Add Your Window Content
You now have the host and theme configuration for your interface. Add WindowFrame content through C# or UXML, following Windows and Layout for window creation, placement, behavior, docking, tabs, and memory identifiers.
You can retain the generated blank root or extend the project-owned UXML with your application's content. Keep your working layout and themes in your project repository rather than editing the installed asset defaults.
When you have added a window, enter Play Mode and check that it appears and behaves as intended. A host with no window content is not a complete visual demonstration.
Optional: Addressables Theme Loading
Use this section if your application will load theme data through Addressables. The repository setup above does not enable the integration, select an Addressables default, or build a content catalog.
- Install Addressables 2.9.0 or later through Package Manager, if it is not already installed.
- Open Window > Asset Management > Addressables > Groups and create Addressables settings if prompted.
- In Theme Manager, choose Addressables > Use Addressables. This enables the framework's Addressables feature setting. Allow Unity to finish any resulting compilation before continuing.
- Choose Addressables > Setup Labels if you want the supplied automatic labeling workflow. Review the resulting entries before building: this action scans all WindowFrameThemeData assets in the project, not only the repository currently open in Theme Manager. It creates or moves their entries into the framework group, adds labels, and assigns addresses based on asset names.
- Open Browse Assets and use Addressable Default on the project ThemeData your application should load. This assigns the ACTIVE_THEME_DATA label to that collection and removes it from the other discovered collections. Configure one intended active collection; opening a repository in the editor is not the same as selecting the runtime Addressables default.
- Inspect the resulting Addressables group. Ensure it has the appropriate content-packing and content-update schemas, and build/load paths for your deployment. Creating entries and labels does not configure a complete content-distribution policy.
- Build Addressables content for your target and test using a Play Mode configuration that exercises the intended loading workflow. Confirm the configured collection loads before relying on it in a player build.
The runtime loading path uses the active label to obtain its theme data. If loading fails, check the Console, the active collection label, group schemas, and catalog/build configuration. See Troubleshooting for the troubleshooting guide.
Player-editable theme files use their configured filesystem folder; they are not automatically made Addressables assets by this setup.
Confirm Your Setup and Continue
Before moving on, check that:
- Unity has finished compiling without errors.
- Your repository is under your project's chosen Assets location, outside the installed package.
- The scene uses your intended controller instance and its project-owned setup references.
- You have added window content before expecting a visible window.
- Your application theme scope is intentional, especially when other UI shares the panel.
- If using Addressables, the intended runtime ThemeData is marked active and the content configuration has been tested.
Continue to Windows and Layout to build the interface, or Theme Studio and Manager to customize its appearance. Graph-based users can consult Visual Scripting Integration for the preview integration. Player customization is covered separately in Developer Extensions and Player Themes.
