Build the content your application needs, then choose how much freedom users have to arrange it.
A WindowFrame supplies the surrounding window structure: a header, content area, optional footer, and configurable window behavior. Your UI Toolkit controls go inside that structure. The same interface can become a movable utility window, a fixed panel, or part of a tabbed workspace.
Before You Begin
Complete Installation and Setup so your scene has an initialized WindowFrameController, UIDocument, and theme configuration. For code-created windows, wait until the controller's RootElement is available before mounting content. Constructing a window does not create a controller for you.
This guide covers ordinary windows. For modal presentation and application-specific menu actions, continue to Tooltips, Context Menus, and Modals.
1. Understand the Window Structure
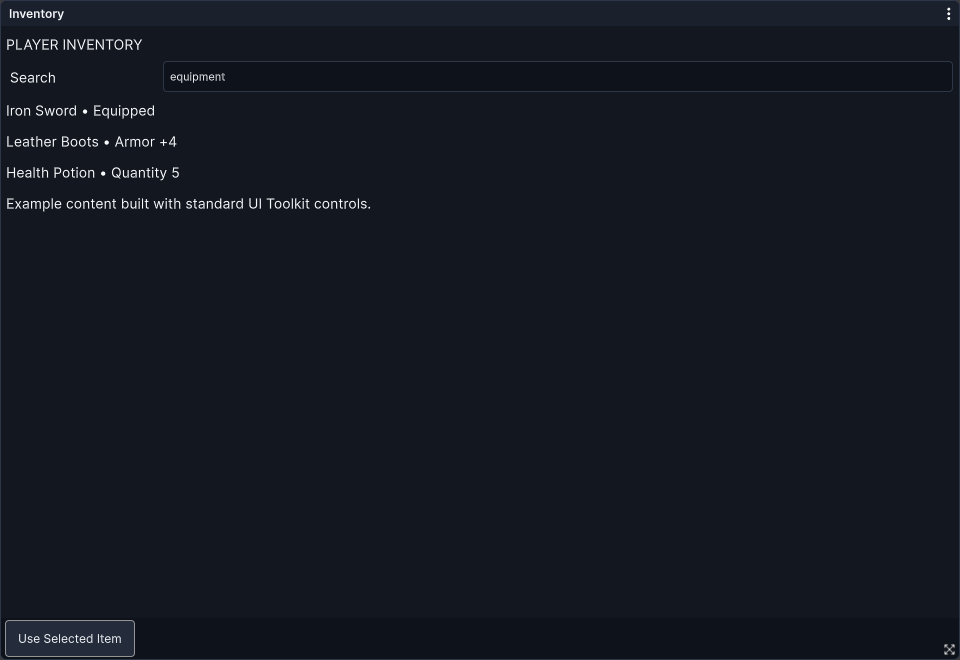
- Header: displays the title, provides the normal drag area, and includes the window options control.
- Content: holds your controls, forms, lists, and other application UI.
- Footer toolbar: provides an optional area for actions, alongside the footer's resize affordance.
- Edges and corners: support resizing when the window permits it. Resizing is not limited to the footer icon.
ShowHeader and ShowFooter control the corresponding areas. Hiding the header removes the normal header-drag area, so choose a deliberate placement or application-controlled interaction for that window.
The content area is also WindowFrame's UI Toolkit contentContainer. Calling window.Add(...) places ordinary child content there; you do not need to insert your controls into the frame's internal header/footer hierarchy.
2. Create Your First Window
Create Through C#
The following method body creates a small help window. Run it from your application's UI-opening path after the controller is ready.
Configure the window before AddElement. The accepted window is attached to the controller's configured root; its opening path applies the theme and handles initial layout, eligible saved geometry, and reveal. You do not need to call Show() immediately to force that first opening.
The example intentionally uses a bare WindowFrame without memory. Later on this page, a concrete application window demonstrates the additional requirements for remembering layouts.
Create Through UXML and UI Builder
For a visually authored layout, open your project-owned root UXML in UI Builder, find WindowFrame among the project's custom elements, and add it to the hierarchy. Set its exposed attributes and place your controls beneath it.
The namespace is GWG.WindowFramework. A minimal document looks like this:
Use this as a small starting document or adapt the WindowFrame element into your existing project-owned root. The controller supplies the configured framework theme; reference your own content stylesheet when adding application-specific styling.
C# properties such as DefaultWidth, ShowFooter, and AllowTabDocking appear as kebab-case UXML attributes such as default-width, show-footer, and allow-tab-docking. Use the Inspector in UI Builder to discover the exposed attributes rather than depending on an older factory/traits example.
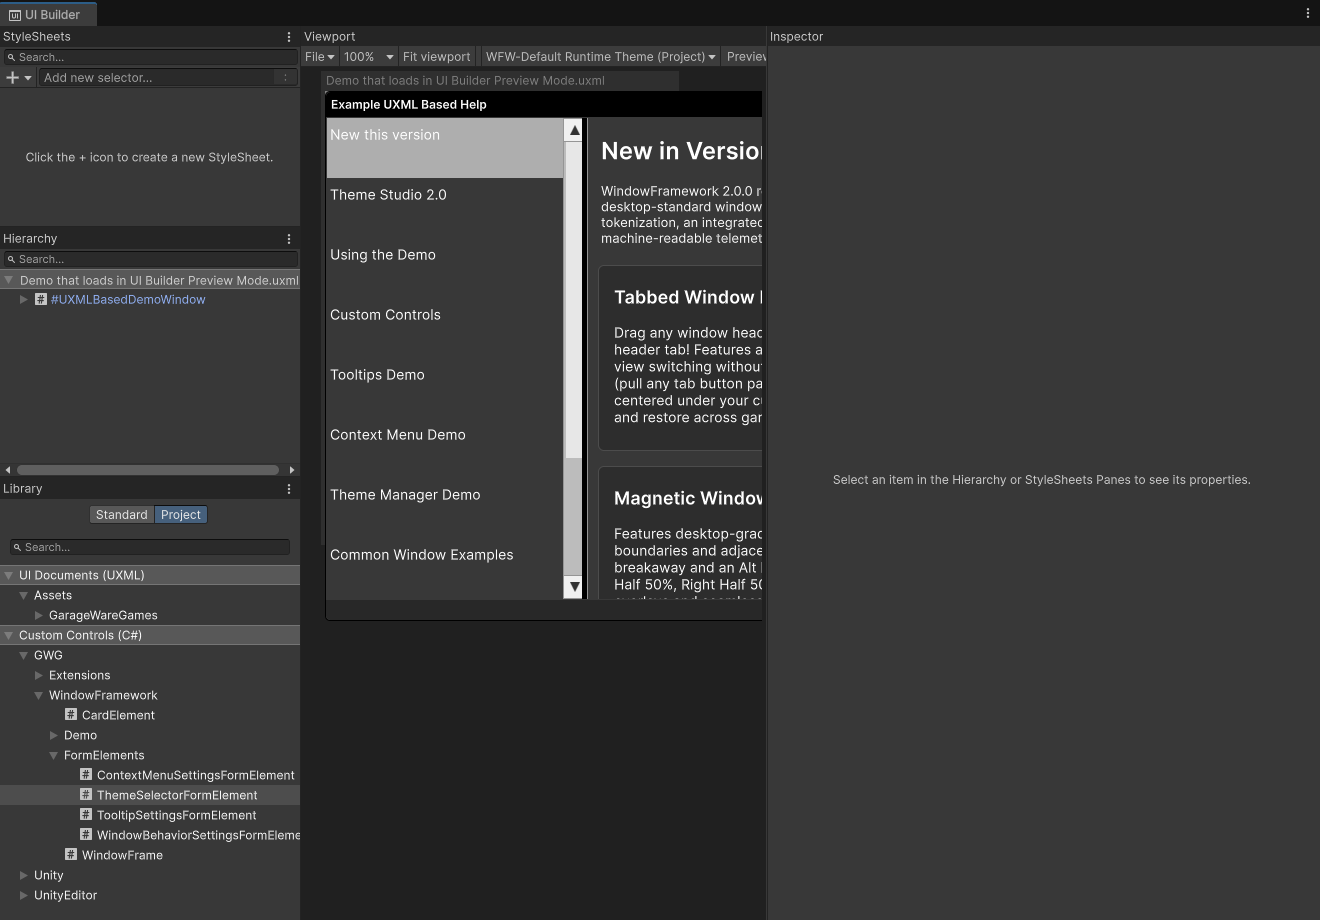
Saving UXML changes updates the authored layout. It does not replace your responsibility to populate runtime data or connect application actions.
3. Add Content and Footer Actions
Compose Your Content
You can build controls directly in C# or use a separate VisualTreeAsset for the content. For an assigned content asset, clone its tree and add it to the window:
window.Content returns the content container. Adding to it appends controls. Assigning window.Content = someElement replaces the existing child content with that element, so use the setter only when replacement is intended. Do not use window.hierarchy.Add(...) for ordinary content: that bypasses the content-container route and inserts into the frame's own structure.
A ScrollView is useful for content that must remain accessible when the window becomes smaller. Give your content sensible flex and size rules in USS; a resizable frame does not automatically redesign a rigid internal layout.
Use a Footer Toolbar
Assign a VisualElement or control through FooterToolbar and keep ShowFooter enabled:
Here, ApplyChanges is your application's action method. Remove application-owned subscriptions when their owner is disposed or the window is permanently closed. WindowFrame handles its own callbacks, not every external event, data subscription, or asset lease your content may own.
Appearance authoring is covered in Theme Studio and Manager; use that guide rather than duplicating framework theme values in each window.
4. Choose Size and Starting Position
Initial Size and Limits
Set DefaultWidth and DefaultHeight before attachment when supplying a creation-time size in code or UXML. These explicit assignments establish inline size at that point. Changing them after attachment stores their values but does not resize the live window.
If your initial size is authored in USS instead, let that stylesheet define it. An explicit inline dimension has normal UI Toolkit precedence over a stylesheet dimension, so do not assign defaults in code and then expect USS to override them.
Use MinWidth and MinHeight to protect the usability of the content. Include the header, footer, and controls in your choice; a numerical minimum is only useful when the resulting interface remains readable. Maximum dimensions can be authored with supported USS rules:
Apply the class to your window with AddToClassList("inventory-window"). The drag resizer uses resolved size constraints, but docking is a different geometry operation; test both paths rather than assuming every dock rectangle is clamped to your content minimums.
Starting Placement
StartPosition offers nine placements:
For example, set StartPosition = GWG.WindowFramework.WindowFramePosition.TopRight before mounting a utility window that should begin at the upper-right edge.
The starting-position calculation uses the current window size and Screen dimensions. Treat it as screen placement, not a general-purpose alignment system for every scaled or world-space panel. Test the result with the panel configuration used by your application.
Eligible saved geometry can take precedence over ordinary starting placement. An explicit position supplied by your layout can also own placement. LockedToStartPosition requests the starting-position policy and excludes remembered opening geometry; it is not the same as AllowMove = false.
Choose these policies together. For a panel that must remain fixed, configure movement permissions as well as its starting position. When investigating an unexpected initial size or location, check existing memory, explicit sizing/position rules, and the start-position policy before changing theme values.
5. Set Window Permissions
Configure behavior for each window's purpose rather than making every interface equally movable.
- AllowMove: permits normal header dragging.
- AllowResize: permits resize interaction; locked and fullscreen windows also restrict that interaction.
- AllowClose: permits ordinary closure. CloseWindow() also checks Locked; a forced close is an explicit application decision.
- AllowLock / Locked: controls whether locking is offered and whether the window is currently locked.
- AllowFullscreen: permits the normal fullscreen interaction. Direct application assignment to Fullscreen is a separate route.
- LockedFullscreen: forces fullscreen when enabled and restricts the normal exit interaction.
- AllowTabDocking: controls whether a window can join a tabbed group through DockTab; both participating windows must permit it.
- AllowMultipleInstances: participates in the controller's duplicate handling when adding a code-created window.
These are not universal authorization rules for every API call. For example, direct docking is not blocked by every drag permission, and UndockTab does not repeat all the permission checks of normal user interaction. Your application should decide whether to offer an operation before invoking it.
Instance Names and Memory IDs Are Different
When the incoming window disallows multiple instances, WindowFrameController.AddElement checks registered windows by VisualElement.name. If a name matches, it activates the existing frame instead of mounting the incoming one. The unused incoming content is not merged into the accepted window.
Give singleton-style windows an intentional name and retain references to the accepted application instances. Do not assume every construction followed by AddElement produces a newly mounted window. Your application still owns subscriptions and resources created for a rejected duplicate.
WindowId, ParentObjectId, and concrete type serve a different purpose: they identify persistence records. Setting a memory ID does not change this name-based duplicate policy.
6. Snapping and Screen Docking
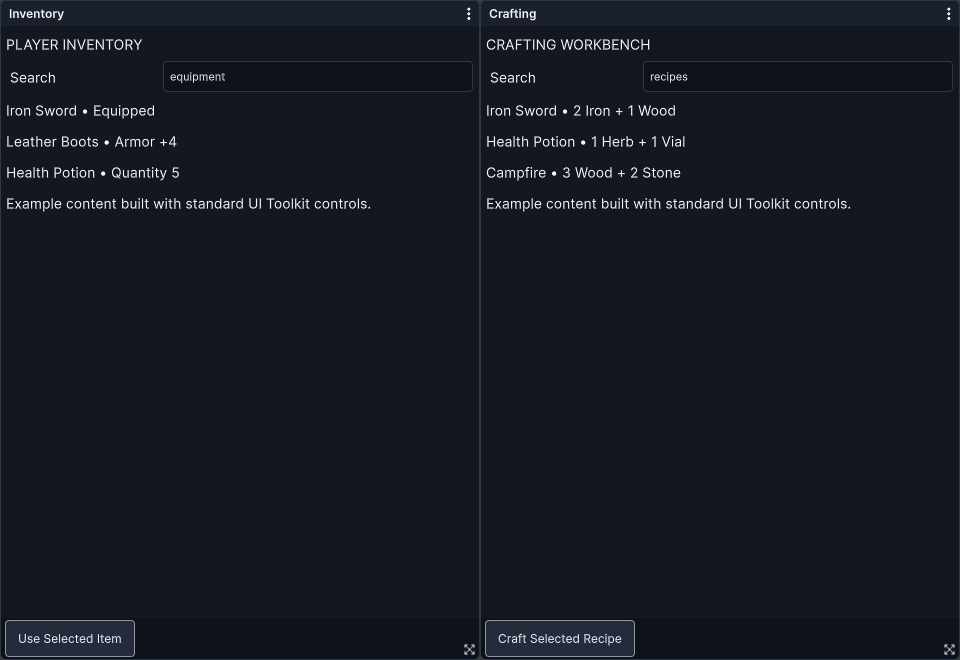
Snapping** aligns a floating window with screen edges or neighboring windows as it is dragged. Supported runtime settings let users enable snapping, choose screen/window targets, and adjust the snap distance. Repository defaults supply the starting preference values.
Docking** gives a window a left, right, top, or bottom half-area rectangle, or maximizes it within the available area. The drag workflow offers docking targets when its relevant settings and window behavior permit them.
For application-controlled docking, use the geometry API after the window is attached and its parent layout is available:
The other supported targets are RightHalf, TopHalf, BottomHalf, and Maximized. Passing Floating to DockTo also takes the undocking route. Use a defined state, not an arbitrary cast integer.
Docking uses the parent's resolved size where available, falling back to Screen dimensions. Call it once your layout is ready; attaching a window is not proof that its parent already has a useful calculated size.
WindowDockState.Maximized and Fullscreen are separate operations. Use the former for the docking layout and the latter for fullscreen behavior; do not treat them as interchangeable flags.
7. Combine Windows Into Tabs
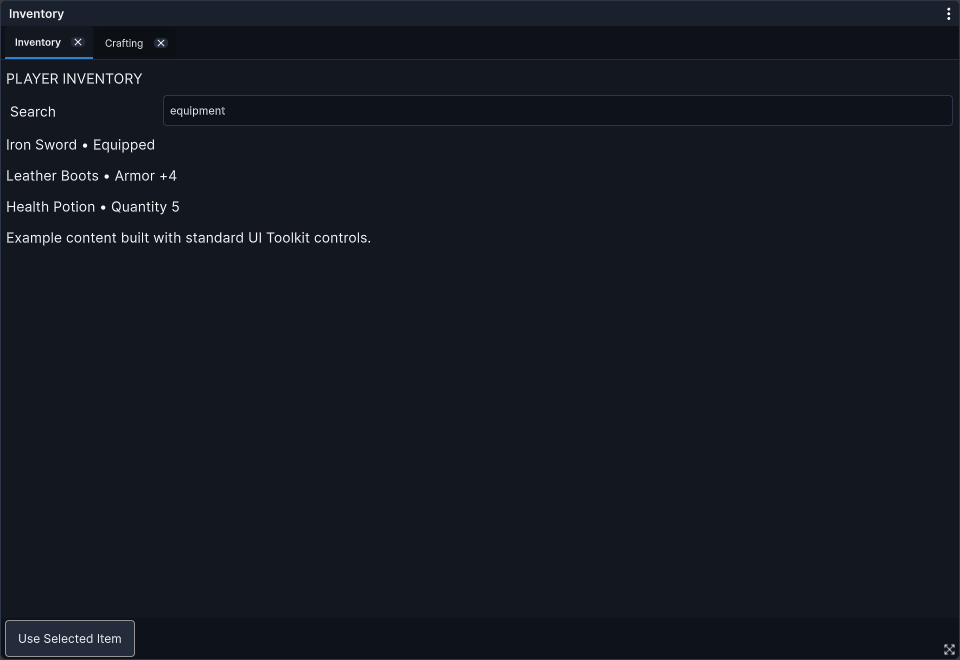
A tabbed group brings related windows into one frame. Through the supported drag interaction, users can join windows when tab docking is enabled, then switch content or detach a tab back into a standalone window.
For a code-controlled group, retain references to the existing host and incoming windows:
When docking, the incoming window's content and footer move into a tab entry and the incoming frame leaves the visible hierarchy. Switching tabs changes the active content and associated footer. Undocking moves them back to the retained source window where available; it does not create a fresh application data model for you.
The tab's X control performs detach, not business cancellation or CloseWindow. Make application actions explicit in your content/footer if users need to discard edits or close a document.
Detaching the original host tab promotes another source window to carry the remaining group. Do not rely on a tab index as a permanent item identity after additions or removals. Consult the current NestedTabs list and retain application references for your own identity and ownership.
8. Show, Hide, Activate, and Close
Use the lifecycle operation that matches what your application intends:
- Show: makes a retained window visible and included in layout. It does not synchronously calculate all resolved geometry.
- Hide: removes the window from layout while retaining the instance. Application data and subscriptions remain unless your own code releases them.
- Activate: asks the controller to make a window active and coordinate the other windows' active state.
- Close: performs the frame's closure and hierarchy removal when ordinary close permissions allow it.
These lines illustrate separate choices, not a sequence required every time a window opens. After a permanent close, reconstruct the application window through its creation path when needed rather than assuming Show() rebuilds its removed callbacks and resources.
Neither hiding nor closing serializes your application content. Save document edits, release leased assets, and detach external event handlers according to the ownership of your application data. For modal windows, use the modal-host workflow described in Tooltips, Context Menus, and Modals.
9. Remember Window Layouts
Give Remembered Windows a Concrete Identity
Window memory needs both controller permission and per-window participation:
- Enable Memory Enabled on the intended controller.
- Set WindowMemoryEnabled on participating windows.
- Use a concrete application class derived from WindowFrame. The current writer excludes a bare WindowFrame.
- Assign a nonempty, stable WindowId, and an appropriate stable ParentObjectId when an owner distinguishes otherwise similar windows.
- Configure those identifiers before attachment and reuse them when reconstructing the same logical window.
For example, put this class in your application's own script area:
Create and mount it when your controller and application data are ready:
For an owner-specific window, use the stable container, character, or document identifier as ParentObjectId instead of the fixed LocalPlayer example. Avoid timestamps or random per-open IDs: they describe a new identity rather than the same window returning.
The record key combines concrete type, parent identity, and window identity. Renaming a type or changing those IDs changes which record is looked up; the framework does not automatically migrate old keys.
Restore Geometry, Rebuild Application Content
A participating reconstructed window can look up eligible state during its opening sequence after theme application and first layout. Supported records include geometry, visibility, and other window metadata; they do not contain an inventory model, arbitrary child controls, external subscriptions, or asset leases.
Your application must still rebuild the content and supply its current data. The example label above is only a content placeholder, not a saved inventory implementation.
ReopenWindows() also provides a reconstruction route for open records. That route resolves the saved type with Type.GetType and constructs it through a parameterless constructor. Use it only when your types are resolvable by that path and can rebuild safely without injected constructor data; placing a class in a different assembly does not guarantee discovery. It does not function as an application-specific factory or dependency-injection system.
If your windows need owner data, services, or another creation policy, reconstruct them through your application's existing path with the same identifiers instead. Do not run both reconstruction paths for the same logical windows.
LockedToStartPosition excludes remembered opening geometry. Explicit application placement can also take ownership of coordinates. Make those choices intentional rather than repeatedly resetting a restored window to its default position.
Controller memory remains developer-controlled. Theme selection, player customization, and preference resets do not enable or disable that policy.
10. Check the Result
Before treating the interface as ready, try the actual interactions in your application's runtime:
- Open a window and confirm the intended content, theme, initial size, and placement.
- Resize it to its minimum dimensions and confirm the content remains usable.
- Try permitted movement, locking, fullscreen, and closing, including operations you have chosen to restrict.
- Check snapping and docking with your project's panel scale and screen size.
- Switch and detach tabs; confirm the correct content and footer actions remain available.
- Reconstruct an eligible remembered window and confirm its saved layout takes precedence where intended.
- Close a window permanently and check your application's external subscriptions and resource ownership.
The illustrations demonstrate actual framework controls and layout APIs, but do not replace testing your application's data, input, panel scaling, and persistence setup.
Continue to Tooltips, Context Menus, and Modals for supporting interactions, Theme Studio and Manager for appearance authoring, or Troubleshooting when configuration prevents the expected result.
